 |
|
| Guest review by Chris Busbridge |
 |
 |
 |
 |
|
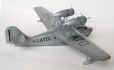
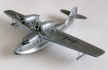
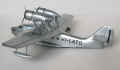
THE KIT This kit is modestly packaged, using what appears to be a hand-made carton that's tailor made to fit the contents as snugly as possible. It has a photo-copied label stuck on the front panel. The vac-form parts are neatly laid out over two rather thin sheets, with the smaller detail parts provided on two identical dark green injection moulded sprues. Detail is somewhat simplified and scratchy and there are quite a few minor surface imperfections over the vac-form parts, especially on the fuselage. As a consequence of Broplan's continued use of thin sheet stock, the extreme outer edge of the aircrafts hull is extremely thin. It will have to be reinforced with sheet stock on the inside to prevent further damage (use superglue, liquid glue will melt and distort). The
injection parts have prominent seams, even a bit of flash, and will
require a fair amount of cleaning up before they can be used. Assembly is
aided by a very neatly arranged double sided A4 sheet that more than
adequately covers all aspects of construction. No decals are provided. The
model is of the 2nd series production, the only noticeable difference to
the 1st series being the types of engines used, cowling and rudder shape.
An interesting conversion project would be the amphibian variant, but this
would require extensive work. After freeing up the vac-form parts from the sheet, I set about preparing the mating surfaces to get a good clean join. This involved heavy sanding on all trailing edges, as well as getting a good neat join line on the fuselage halves and wing leading edges. The engine nacelles and cowlings were also treated in the same manner. There are 2 rudders, with and without mass balances. In this instance, only I-LATO had a rudder without the mass balance. A wing spar is used to aid wing dihedral and passes right through the fuselage. All the circular windows were carefully opened up and the corresponding clear vac-form glazing glued in place. They were not terribly clear but did help obscure the view of a rather bare interior. No clues given to interior colours, so a light grey was used. Internal detail was restricted to the cockpit area only, the rest being just a series of fuselage bulkheads and a floor. These were carefully trimmed to ensure the two fuselage halves could close neatly around them. 20 x 2mm tabs were also placed alternately along the edge of each fuselage half to get a stronger join, making sure they did not interfere with the bulkheads or spar. After the upper & lower wing pieces were glued together and allowed to dry, several attempts were made to get as good a join to the fuselage as possible, to minimise the amount of filler needed. The stabilisers and rudder were butt joined. The over wing vac-form engine nacelles are propped up by injection moulded struts, whose ends are placed in large 'divots' in the wing. Some may prefer to fill these in and trim the struts to fit flush with the surface. Another method, and the one I ended up using, was to glue everything in place, allowed to set and then carefully saw the whole sub-assembly back off. This allowed good access to the whole of the top wing when preparing the model for spraying and also ensure all struts were perfectly aligned when re-attaching them. The cowlings are vac-form with injection-moulded exhaust collectors. They fitted comfortably over the injection moulded engines, which sort of resemble the single row 9-cylinder Alfa Romeo units. Last items to apply were the outer wing-floats and the cockpit canopy, whose frames had been previously masked. There are a few small detail items missed by Broplan, such as series of what appears to be vents along the spine of the fuselage, two venturi tubes just aft of the cockpit and a tie bar on the nose tip. COLOUR
OPTIONS Broplan may have got confused by the 1st series, which did have the blue applied to the cowlings. The blue cheat line from the rear of the canopy to the wing tip was airbrushed after careful masking. With no decals supplied (a normal Broplan practise) I decided to have a go at making my own. I found a supplier of suitable inkjet paper and using a graphics programme drew up the required markings. The printed sheet was sprayed a few coats of varnish and after allowing time to dry, I was able to apply my home-made decals with relative ease. CONCLUSIONS Many thanks to Broplan for the review sample. |