
|
|
Guest review by Joe Norris |
|
|
|
Guest review by Joe Norris |
 |
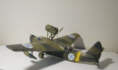 |
| The 1:1 prototype for this kit is a sort
of scaled-up monoplane Walrus with an inline engine, if
that places it for you. Avia is one of the proliferating
new labels from the Ukraine, and I hope to see more from
them. IN THE BOX In the box is a sensibly engineered set of semi-short run parts, a colourful decal sheet for several each of VV-S and Finnish examples, and four sheets of bilingual (English and Ukrainian) instructions printed both sides. The instructions feature several grainy scanned photographs of the decal subjects, and are illustrated with mostly clear line drawings including colour call-outs. There are a few nitpicks, but nothing fatal, especially in a first effort. The fabric effect is a bit overstated and the ribs aren't as evenly laid out as they could be. The cockpit canopy will need some persuading to fit around the front corners (Trim the nose decking, not the clear part). The tail plane slots into the fin without positive alignment devices and is surprisingly hard to get square, particularly in plan view. Interior detail is a little sketchy but will do after everything is buttoned up unless you're a fanatic, except the two machine guns really should be replaced with something a bit more convincing. Don't put too much effort into the rear gunner's position, which will be invisible after the turret bubble is on. COMPONENT FIT Everything fits pretty well, but needs meticulous dry-fitting, trimming, and filling, particularly the fuselage seams, and the separate control surfaces mean the wing trailing edges are a little tricky especially at the roots, where there is nothing in the parts as moulded to hold the main surfaces apart. A couple of slivers of scrap card on the fuselage sides will align them sufficiently to add the flaps later. The exhausts seem to me a bit anaemic and are evenly spaced instead of in pairs as per the Hisso arrangement, and the prop has the blade profiles set up for a tractor arrangement instead of a pusher; fortunately they are moulded thick enough to reverse the camber, or you could just swap the shaft back to front. Partly because the porthole inserts are thick and partly because of all the handling you will need to do, it will work better to apply white glue or similar after the paint and decals are on. On the plus side, we can start with the subject itself, which was used in substantial numbers for many years in a tough environment where the stories would be really worth hearing, and it is uniquely represented by this kit. The clear parts are clear and fit properly, including the optional position entry hatch in the cockpit canopy. Parts breakdown is logical, with the fuselage in six pieces (planing bottom, sides, and three upper deck sections) and separate flaps and ailerons for the wings. ACCURACY With care, everything fits well even when first impressions suggest they won't; I did have to replace two of the tailplane struts because I got the alignment a tad off, but they would have fit if I had got it really straight. It is easy to interpret the instructions for the side floats in a way that will guarantee problems, but the right sequence will suggest itself if you look at the parts themselves. I was impressed with the engine egg, which comes in two main halves and has thin lips at the front leading into the radiator housing. The top and bottom seams line up very nicely causing no problems at the lips - score extra points for Avia. A first, to me, in any kit is the inclusion of pre-coloured clear navigation lights for the wing tips, very classy although they ratchet the finish standards for the rest of the model. I can't address accuracy, since all I know about the prototype is what it says in the instructions, but the mold-makers' care about the physical quality of the kit leads me to think they took similar care to follow whatever references were to be had. (It is very accurate, Ed) My assembled model looks enough like the photographs to suit me, anyway. PAINT SCHEME The colour callouts are about right for the VV-S schemes, but they suggest Russian colours for the Finnish schemes, which is "close but no cigar", especially the Finnish underside blue. The two air forces took a similar approach to similar environments, but arrived at visibly different shades of green, and in the case of the MBR airframes, the Finns did a complete new paint job, not just the markings. According to my references, by the way, the Finnish underside blue is a fairly close match to the "metal use primer" blue-green promulgated on the VVS site, and so is very different from the Russian blue. On the assumption that the basic airframe was of wood, I did the interior in the wood primer gray which is close enough to 36118 for the government I was working for. I finished with a mix of kit decals (fuselage codes) and bits box (roundels, from an old Frog Blenheim). The kit decals are mostly usable, but not marvellous. The Finnish roundels have the swastikas in a shade of blue I don't think is quite right and the strokes are too narrow, but the red stars are, well, red stars - not much there to get wrong. FINALLY...... In summary, I had fun putting this kit together, and it is a must-have if you're a flying boat enthusiast, or even if you just like to do interesting and historically significant subjects, although it does want some serious modeling experience to get the best out of it. REFERENCES Many thanks to Joe for this detailed review. If you require reference material for the MBR-2 then please e-mail SEAWINGS who will be pleased to help. |